Wednesday, July 24, 2013

Project Life - Catching up on 2011: Photographs

Sorry this is late, we are hoping to get our house on the market shortly and I have been cleaning like a maniac to get stuff done.

I scrapbook to preserve memories. Plain and simple. With those memories, I love to have photographs, so today I am going to share with you my process for sorting and organizing my photos after they have been printed.

First of all, all of my digital photos are saved on a computer, external hard drive, and off-site backed up in folders first with the year and then each week has its own folder where the pictures are located. This makes is so easy to go through the photos I have when I need to find a specific one. The best part of digital photos is that I can see the exact date/time the photo was taken, provided my camera was set up correctly.


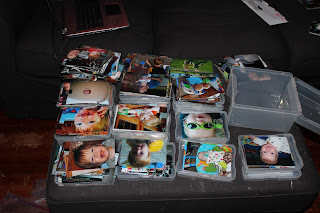
Here is a look at the drawer that currently contains all of the photos I have printed but not organized from 2010-2012. It's absolutely not how I want my photos to be stored, however they are protected from the light.


Normally, I like to keep them organized in the small 4x6 Iris cases that are made to hold photos. I have a few of the small Iris boxes that hold the photo cases, however I wasn't sure what I was going to do with all of them, so many of my cases are loose. When I pulled the 2011 cases out of the bin that holds my sorted and dated photos, I was quite surprised and excited to see that so many already had photos in them, and a lot of photos in some.


This made my job easier. In a couple of hours, I was able to go through the envelopes from the drawer and sort the 2011 pictures out and then sort them by month.


After the pictures are sorted by month, I use the computer to help me find the dates and use a small date stamp and StazOn ink to lightly stamp the date on the back of the photo. Then I sort the photos by date in the small Iris cases and set them aside to be scrapped.


I was able to complete this entire process (sans organizing them on the computer which I do as I download them off the camera) in 2 days! :) I feel like I am ready to get moving on these albums, and over the course of the next week, I plan to work on the January pictures. Friday, I am hoping to share my January pages, inserts and 12 x 12 layouts.

This system works really well for when I am behind on Project Life, because it keeps my photos together by month and makes them easier to find. Starting at the beginning of 2013, I began printing my photos every Saturday night, after my boys go to bed (weeks run Sunday-Saturday). When I pick them up from the printer I label the envelope with the week numbers and the dates and then throw them in the Iris box for the month I am on to keep the photos with the supplies...eventually I will blog about this process, but it probably won't be until my 2011 albums are complete.

I hope you will continue to join me on this journey and your comments are appreciated. Thanks for stopping by.

Friday, July 12, 2013

Project Life - Catching up on 2011: Getting Started

As I explain how I got started with my albums and organization, please understand that I am Type A...and a little OCD when it comes to my albums. I feel that I need to have everything color coordinated and match up as best as possible when I put together a week, and that does include my inserts.

Main Album

First, I put enough Design A page protectors into my album for the entire year. I know that I may eventually need another binder since this is the only album I do for the year and I end up using a lot of inserts (12x12 and Project Life Plastics) to include all my pictures and stories. Then I sorted my Amber Core Kit by color and design to match up the 4x6 cards with the 3x4 journaling and filler cards as best as possible. Once everything was organized the way I liked, I placed 1 4x6 card, 1 journaling card filler side showing and 6 journaling cards for each week. I also placed the first and last page cards into their respective protectors. These will change a little as I go along, because I like to include a family photo at the beginning of the album along with other embellishments. Additionally, I went through and stamped the dates for each week on the title card...which will probably be all I'll do with them unless I decide to put some embellishments on them for special weeks.


I took this picture before I had inserted the month dividers into the album. They are now in the correct spots in the album.


Journaling Binder

In this binder, I have printed 53 "weekly journaling sheets" from Marcy Penner and wrote the dates for the weeks at the top. My plan is to go through my pictures on the computer and make notes about the pictures based on notes I have in my 2011 box and what we can remember about the pictures. I will probably do these one month (about 4 weeks) at a time and do the notes so I don't get overwhelmed and give up.


Mini Album

I have looked through the cards in the Dear Lizzy Project Life Kit and they are so cute and will be fun to use. Until I get closer to working with the pictures from our trip to the zoo, this album, and kit, will just stay in the 2011 box and wait for me.

Pictures

I was pleasantly surprised when I went to collect my Iris photo boxes that are supposedly housing my 2011 pictures. I figured that I had only sorted and stamped a small amount of these photos, however from the looks of the boxes I have more done than I thought. Next week, I will devote my entire blog post to my method for sorting, organizing and storing my photos to make them easier to put into my albums. Until then, this is what 2011 currently looks like. :)


Cardstock Update: I have not made it to Michaels to try to match the cardstock cards from the Amber kit to get some 12 x 12 sheets of matching paper. I am hoping to have some time this weekend to do this and will post the colors with my next post.

I know this process is slow going at this point, but for me once everything is organized for a project it seems to come together a lot faster for me. I hope you continue to join me on this incredible journey on catching up on an entire year of photos using the "Project Life" method and products. Thanks for stopping by!

Sunday, July 7, 2013

Project Life - Catching up on 2011: Organization

In a new series of posts on my blog, I will be sharing my process for catching up on all of my photos from 2011. This is the only family album on my shelf that has been entirely neglected and I really want to start working on it. One thing that I did to start working on this project was try to Google the topic of catching up on Project Life, but the only things I found were short picture blog posts and fast paced videos. No one really broke it down in a helpful way for me. I know that everyone does things differently, but I was hoping to see a "step-by-step" breakdown of how someone did this. That is my plan...a "step-by-step" on how I work through this album and a series of Friday blog posts to show you my process, progress and suggestions.

As I want to catch up on this album quickly, I am going to employ the "KISS" (Keep It Simple Silly) method and use Project Life.

My 2011 Album Supply List:
We R Memory Keepers 12x12 Burgundy Album (to match our other family albums)
8 1/2 x 11 Binder I bought at Walmart (for planning pages)
Amber Project Life Core Kit
53 Planning Pages (already in small binder)
Amber Edition 12x12 Coordinating Cardstock (patterned)
4x6 Amber Edition Cardstock Cards
3x4 Amber Edition Cardstock Cards
Design A Pocket Pages (already in binder)
Scissors, Smash date stamp, StazOn Timber Brown ink pad, Recollections photo markers, Tim Holtz tiny attacher, adhesive, We R Memory Keepers yellow corner rounder (1/8" and 3/8"), Fiskars paper trimmer (not pictured)
Bazzill plain cardstock (not pictured...I'm still trying to figure out what colors to buy)
Random Embellies from my stash and Cricut Die Cuts

We took a trip over Easter (2011) with the boys to the Minnesota Zoo. I am going to do a special mini album to document this trip, as I took a ton of pictures that would probably take up half of my 12x12 album in inserts to do.
Mini Album Supply List
Becky Higgins Blush Album
Project Life Dear Lizzy Mini Kit
Random Embellies from my stash and Cricut Die Cuts

Supplies!

This is how I have my supplies organized for this project. I have a Cropper Hopper Paper Holder for the  12x12 papers and the small box to hold 4x6 and 3x4 sized cards.

My photos from 2011 are in a drawer and not very organized, however they are printed. The first post (or two) will be devoted to how I start working with these.

Over the next few Fridays, I will be sharing my process with you. I hope you will join me in this journey. Please feel free to ask me questions!